Sunday, August 19, 2012

Presto! Pesto for Dessert?

There are occasions when I need to quickly whip up an appetizer, entree, and/or dessert. I have found one component that takes minutes to prepare and that can really bring a dish together. Add pesto and Presto!

I created a turnip green pesto recipe for my cookbook. Turnip greens grow abundantly in the South. To prepare pesto, a bunch of greens is needed. Basil is traditionally used, but I seldom have the quantity required so I thought turnip greens would work well.
My pesto is very versatile. For a simple appetizer, my family and I enjoy the turnip green pesto with olive oil and focaccia bread for dipping.
I also recommend in my cookbook tossing the pesto with pasta for a quick pesto pasta salad.
In the photo above, I created a mozzerella-pesto stuffed meatloaf. The flavors worked so well together and was a great way to add greens into a dish. With the ooey goodness of mozzerella, even kids won't turn down greens with this meatloaf.

Turnip green pesto is just one version but there are so many other types of pesto that can be created.
Mustard greens have soft leaves and a unique flavor. I created a mustard green pesto to pair with my spiced lamb kebobs but it also pairs well with my eggplant and ricotta "stack." While my turnip green pesto combines turnip greens with walnuts and parmesan cheese, for my mustard green pesto, I add ingredients to compliment the flavor of the greens, pistachio for a slight sweetness and feta for saltiness.

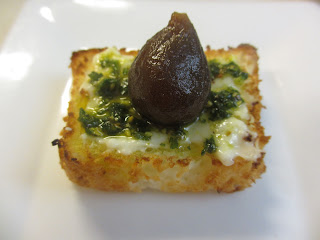
Now, pesto for dessert?
Yes, there is a pesto that tastes great in a dessert.
My mint-pistachio pesto adds a bright, nutty, and slightly sweet flavor to any dessert, especially this easy one.
-Slice, then toast angel food cake
-Melt a thin slice of brie on top
-Spread on a small amount of pesto
-Top with a fresh or cooked fig (or cherry)
Mint-Pistachio Pesto
1 Tbsp. shelled & skinned pistachios
1/4 cup packed apple mint
fruity olive oil (I used California Olive Ranch's Arbequina)

Pulse the pistachios a few times in the food processor. Add the apple mint. Drizzle in a small amount of the olive oil. Process. Add more olive oil to produce a pesto consistency.
This pesto also pairs well with chocolate. Think mint-chocolate chip!


Wednesday, August 1, 2012

Southern Candy Bar

If you have a copy of my cookbook (Modern Hospitality: Simple Recipes with Southern Charm), then you know I like grits. I feature grits in the breakfast, entree, and dessert section. Yes, dessert section. My dad loves the combination of coconut and chocolate. I created this simple dessert using basic, inexpensive pantry ingredients that you probably already have on hand. You’d never guess that the secret ingredient in these decadent little bites is a Southern staple: grits!

This is the heading for my Crispy Coconut Bites with Chocolate Sauce recipe in my cookbook using grits. Keeping with my inspiration for this dessert, I decided to create a Southern candy bar for my dad. Grits pair well with coconut because the texture of the grits melds with the texture of the coconut. Even if someone is not a fan of grits, they would probably not even know they were eating grits in this dessert. I actually have proof of that statement. I was conducting cooking demonstrations for Women's Health magazine's "Are You Game" event last year in both Chicago and New York.
I prepared my crispy coconut bites for the event. Before the women sampled the bites, I told them that I was not going to tell them the secret ingredient until after they ate it. I watched as they took a bite. Smiles and expressions of joy filled their faces. They liked it; so I thought they were ready to hear the secret ingredient. The secret ingredient I told them is Grits! You should have seen the faces of the New York ladies who have probably never even seen grits before. I heard from the crowd, "but we don't like grits." I said, "well I guess you do now haha! " They all laughed. The story to be learned, if you think you don't like grits, try my crispy coconut bites and this recipe for my Southern candy bar.
Southern Candy Bar
1 cup coconut water
1/3 cup coconut milk
½ cup quick cooking grits
2 Tbsp. granulated sugar
½ cup shredded sweetened coconut
12 pecan halves
½ lb. chocolate, preferably bar not chips (milk, semi-sweet, or dark)

Bring the coconut water and milk to a slight boil in a small saucepan over medium-high heat. Whisk in the grits and reduce heat to low. Cook, stirring occasionally, until the grits reach porridge consistency, about 5 minutes.

Remove from the heat and stir in the sugar and shredded coconut. Spoon the grits mixture into a wax paper-lined loaf pan. Spread out evenly with a rubber spatula and let cool at room temperature for 2 hours or until slightly firm.

After 2 hours, cut the coconut mixture into 12 rectangles.

Chop the chocolate into small chunks.
To temper the chocolate, fill a small saucepan with a few inches of water. Bring the water to a simmer over medium heat. Place a bowl on top of the saucepan and add a third of the chocolate chunks. Once the chocolate starts to melt, begin stirring the chocolate. Stir in the second-third of the chocolate chunks until melted. Then, stir in the last of the chocolate chunks until smooth. Transfer the bowl to the counter lined with a kitchen towel.

Lay out a large piece of wax paper on the counter.

Working with one bar at a time, place a bar on a slotted spatula. Top each bar with a pecan halve in the middle of the bar. Spoon melted chocolate over the bar until completely coated. Lightly tap the spatula to remove excess chocolate. To cover the bottom side of the bar, spoon a line, the size of the bar, of chocolate on to the wax paper. Using a butter knife, slide the chocolate coated coconut-grits bar onto the line of chocolate. Repeat with the rest of the coconut-grits bars. Allow to rest until chocolate has hardened.

Enjoy immediately or store in an air-tight container.

Makes 12 bars

Sunday, July 29, 2012

Campfire S'mores Scones

During my recent trip to Los Angeles, my mom and I rented bikes and hit the streets, biking to Venice Beach and Abbott Kinney Street. Parking the bikes, we ate our way down the street, starting with GTA (Gjelina Take Away). We sampled their brown sugar-blueberry scone. I loved the contrast of the crunchy scone exterior with the soft bready inside. The rich flavor of brown sugar not only topped the scone, but permeated throughout.
Continuing to walk, luckily the clothing shops were closed or I would have been greatly distracted, we happened upon a long line of people at what looked like a small cafe. The sign on the wall read Intelligentsia. Curious, I asked a man standing nearby who told me that this was the best coffee shop and by the way, it also had the best pastries. Of course, we couldn't move on after hearing this, so we joined the crowd outside. While standing in line, we took in the atmosphere. It was very much an earthy, industrial feel. Outside the small glassed entrance were concrete walls; greenery extended up one wall, flanked by earth friendly wooden slatted benches and tables. After arriving at the front of the line, I placed an order for a latte and a campfire s'mores scone. The pastries looked familiar to ones I had seen at Short Cake cafe/bakery located in the Farmer's Market at the Grove. My suspicion was confirmed by the barista who told me how their pastries were provided by Short Cake.
I watched as "my friendly barista" ground the beans for my latte and after brewing then poured the espresso. Lastly, she slowly added the Straus Family Creamery's cream forming a beautiful design in front of my eyes.
It was definitely worth the wait. It was the best latte I have ever had; the smoothest latte without a bitter aftertaste. The accompanying scone was really good also, different from GTA'S in shape and texture. It was round, a common shape for British tea scones, whereas GTA's was more triangular. The s'mores scone's texture was crumbly to the fingers, soft and moist to the tongue, with chunks of chocolate and a sticky marshmallow topping.

Last night as I was watching the Olympic's women gymnastic competition, I had a hankering (Southern slang word for craving/desire) for something sweet. I thought about that wonderful s'mores scone I had in LA. I knew that I already had a great scone recipe that I developed after returning from South Africa. By tweaking that recipe, I could create a s'mores scone. For the graham flavor, I processed enough graham crackers to equal 2/3 cups. My original scone recipe http://whitneymillermc.blogspot.com/2012/06/sweet-memories-from-south-africa.html calls for 1 2/3 cups so I thought I could get enough graham flavor with the two-thirds.

I removed my scones from the oven and then thought about how I would toast the marshmallow topping. Without really thinking it through, I dolloped the topping on the scones; then returned them to the oven to broil. I peered through the glass of my oven to see the marshmallow topping melt off of the scones. I quickly retrieved the scones from the oven. Oh no! I hope I didn't ruin my scones. I tried to wipe away the excess melted marshmallow topping before my scones became too soggy. To repair the ones that were damaged, I placed them back in the oven on bake to hopefully evaporate the moisture. Thankfully, it worked! I made more maple marshmallow topping and this time pulled out my handy dandy blow torch to toast the tops. *You can also take store bought large marshmallows, halve them, top the scones and broil in the oven. Because they are more of a solid, they should toast before the marshmallow melts. Then enjoy the ooey gooey deliciousness!
Campfire S’mores Scones
Scones:
About 8 graham crackers
1 cup self-rising flour
1/8 tsp. baking soda
¼ tsp. baking powder
Pinch salt
1/3 cup unsalted butter cut into cubes, cold
2 ½ Tbsp. light brown sugar
1 large egg plus 1 egg (egg wash), beaten
4 Tbsp. buttermilk
1/3 cup semi-sweet chocolate chips
Maple marshmallow topping:
1 envelope unflavored gelatin
¼ cup plus 2 Tbsp. pure maple syrup
Preheat oven to 425 degrees F. Grease a baking sheet with cooking spray.

Process enough graham crackers, in batches, in a spice grinder or food processor until the texture of flour, to produce 2/3 cups. Pour graham flour into a large mixing bowl.
Sift the flour, baking soda, baking powder, and salt in a large mixing bowl. Rub the butter into the graham-flour mixture with your fingers until it is the size of breadcrumbs. Stir in the sugar.
In a small bowl, beat the egg and buttermilk until combined.
Stir the egg mixture into the flour mixture and mix until just combined. Stir in the chocolate chips. Then using your hands, lightly knead the dough together to form soft, slightly sticky dough.
Place the dough on a floured surface and shape into a sphere then pat down about ¾-1 inch thick. Using a floured 2-inch cookie cutter, quickly push the cutter down through the dough and lift without twisting. Cut out scones, reshape dough, and repeat. Creates about 12 scones.
Place the scones on the greased baking sheet and brush the tops of the scones with the beaten egg.
For the maple marshmallow topping: Sprinkle the gelatin over ¼ cup cold water in a small saucepan. Stir over low heat until dissolved.  Add the maple syrup. Mix well, then heat over medium-high heat until it almost comes to a boil.
Pour the warm syrup into a deep mixing bowl. Using an electric hand mixer beat on high speed for 6 minutes.
Place the scones in the oven and bake for 7 minutes. While the scones are baking return to mixing the marshmallow mixture for another 6-7 minutes or until doubled in volume and forms soft peaks.
Transfer the scones immediately to a wire rack to slightly cool.
Once scones have slightly cooled, spoon a dollop of maple marshmallow topping on each scone. Using a hand torch, toast each marshmallow topped scone until browned.
Serve slightly warm.
Makes about 12 scones

Tuesday, July 3, 2012

4th July Festive Foods

4th July is always a favorite holiday of my family. What makes it special is that it is also my mom's birthday. My family and I have spent 4th July at some fun places like the beaches of Florida and patriotic Boston, MA.
         On the 4th July a few years ago, at the Marriott Grand in Point Clear, AL, enjoying s'mores
         on the beach.

Fireworks are one of the most important parts of celebrating my mom's birthday on the 4th. Allow me to describe how important fireworks are to her. My mom had my sister, dad, and I stand on a huge bridge with a crowd of people in the RAIN to watch the huge fireworks show in Boston.
Not only are fireworks an important part of the celebration but more importantly the food. Whether our 4th July spread is on a picnic table, at the beach, or in our back yard; one thing stays the same the food is flavorful and fun!
Squash, zucchini, tomatoes, peppers, watermelon, figs, peaches, strawberries, and blueberries are all abundant right now so take full advantage!
My mom's recipe for her crispy pita BLT uses squash and jalapeno peppers in a unique way by oven-frying them. You can find her recipe in this month's issue of Taste of Home.
If you are wanting to crank up your grill, my miracle marinade in my cookbook will make any meat tender, flavorful, and mouth-watering good!
Miracle Marinade
1 tsp. olive oil
4 tsp. finely diced onion
8 Tbsp. soy sauce
2 tsp. apple cider vinegar
2 tsp. sugar
½ tsp. paprika
2 tsp. lime juice
2 tsp. orange juice
½ tsp. garlic
¼ tsp. fresh ginger

Heat a small skillet over medium heat. Add 1 tsp. olive oil and onions. Cook until caramelized about 2-4 minutes.

Combine the remaining ingredients into a small bowl.
Stir in the caramelized onions.

Use Immediately or store in an airtight container in the refrigerator for up to 1 week.
Makes: ½ cup

If the grill is too much work for you, keep it simple and prepare bbq pulled pork, recipe found on page 55 in my cookbook, in the oven. I love to serve my coleslaw and creole succotash alongside.
For a knock-your-socks-off dessert, my cool and creamy strawberry cream cupcakes are the perfect 4th July dessert. Add blueberries to create a festive red, white, and blue treat!

Tuesday, June 26, 2012

Exciting New Discoveries

Barely containing my childlike excitement, I lean sideways in my seat, pressing my face against the cold surface of the small window, straining to peer through the thick clouds, eager for my first sight of  "Africa". Finally, as the plane begins its descent to the Hoedspruit airport, the clouds start to separate and I can see clearly the golden grassy African plains, the setting for my family's safari adventure. The grassy plains stretch for miles, broken only by scatterings of cacti, thorny bushes, and trees.
Out of this expanse, I observe as a black dot appears and then stretches to form a line, lengthening until it becomes an airstrip. I feel the familiar jolt as the plane's wheels hit the tarmac and soon the loud whooshing sound of the plane's brakes fills the air. The plane rolls to a halt.  Still peering out the small plane window, I look intently for any sign of civilization, especially for a "standard" airport terminal. Once the seatbelt lights are extinguished and it's safe to leave my seat, I fall in line behind the other passengers, making my way through the aisle of seats and down the narrow stairs, gripping the handrail with one hand, while holding tightly to my small carry-on case with the other.  No terminal in sight, I blindly, along with my mom and sister, continue following the others, walking towards the end of the runway. Finally, the vague shape of a building appears, almost completely camouflaged with its blend of desert colors and fenced wall of what looks like  bamboo. Still following the lead of the people in front of me, I walk through an opening in the bamboo fence.
Looking to the left, my gaze is caught by a line of safari lodge drivers with their uniformed khaki shorts and shirts, standing along the sidewalk near the entrance to the building, holding signs clearly labeled with names.  Smith, Johnson......For a moment,  I experience that same old  nervousness in the pit of my stomach, that fear of being left or somehow forgotten...Jones, Miller....I sigh in relief to see our name.. I don't ever want to repeat the transportation mixups that occurred in our recent international trip to Dubai. So many times, due to language barriers, we were left waiting, tired and stressed, not knowing if someone was going to show.
Later,safely in the company of our driver, my mom, sister, and I wait on the small sidewalk outside the terminal entrance ,watching with humor as a large green tractor pulls up with a small trailer, luggage in tow.
As it rolls to a stop, our driver stands alert as the luggage is unloaded, listening for a word from us, "There it is; that's mine! The pink tag...that's Britt's!". He reaches for our luggage and then, places it in a huge white van with the words Thornybush  printed on the side.
Settled in our seats, having been made comfortable with an offering of cold bottled water from a cooler, we are finally on our way, focused intently on the scenery as the vehicle takes us farther and farther into unknown territory. Tall wire fences line both sides of the road. At intervals, signs appear identifying entryways to various game reserves and lodges.  After traveling for some time, the driver abandons the paved road in favor of a pale dusty, gravel one, the remainder of the lodge trip rough and shaky to say the least, the road marked by uneven ridges.
At last, the moment we have been waiting for..."safari" animals, zebras! At first sight, our immediate impression is amazement! Up close, in the wild, the zebras not only seem much larger than the ones we have seen in zoos, but also more vivid in color. The stark black and white patterned coats were mesmerizing. I could understand how easily the designs could confuse  predators in the crisscrossed thorny branches of the African plains.  Incredibly, those same vivid stripes were echoed in the short seemingly-manicured stiff-haired mane. The beautiful eye-catching patterns reminded me of designs I had once viewed through the lens of a kaleidoscope.
After driving through what seemed a maze of roads heading off in different directions and gaining access through a security point, the vehicle rolled to a stop at what I learned was the main Thornybush lodge. Smiles and hellos as well as small stemmed goblets filled with homemade lemonade awaited  us, the presentation intriguing with tiny edible flowers delicately threaded on toothpicks and suspended on the glass rims. After the brief interval of refreshment, we resumed the second leg of our journey. Transferring to another vehicle, a long army green land rover with the words Shambalala on the door, we were introduced to Ryan, our ranger and guide for the safari. A glimpse into Ryan's personality and sense of humor was soon evident as the rough road led to one bounce too many, sending my small black suitcase flying through the air. With an apology and a sparkle in his eyes, he quickly brought the land rover to a halt, jumping down and retrieving the case, dusting off the thin layer of sand and gravel. I could not help but laugh as the incident emphasized to me the true ruggedness of the safari experience. Traveling in an open vehicle with cases piled in the back, I could only imagine the early days of travel when flying luggage may have been a common experience.
In sharp contrast to the rugged travel,  my first experience  at the Shambalala lodge was the hospitable presentation of a silver bowl filled with moist cloth hand-towels for refreshing and cleansing after the long trip. It felt very much like "pampering" and I liked it! "Ready for a tour of the property?'... We eagerly followed our guide, not at all anticipating what we would see next. Africa came to us....in the form of a warthog crossing the sidewalk, and then, all of a sudden an antelope appearing nearby.  Then, the quiet was interrupted by sounds from a tree branch above us alerting us to the presence of another animal, a cute little monkey, just like ones I've seen in the zoo! However, I was disappointed as he scampered off before I could get my camera out, perhaps a bit camera shy , not wanting to stay close long enough for a photograph.
Lulled by the peacefulness of the animals we had met so far in our tour of the lodge grounds, I strolled confidently ahead only to draw back startled at the sight of a snake on the path in front of me. Quick to assure us that the snake was not real, the guide explained us that the rubber imitation was deliberately placed outside the open doors to the library to discourage unwanted visitors, in particular, the bold baboons. They are notorious for ransacking belongings, searching for anything associated with food. To further emphasize this fact, we are warned to be sure to secure our rooms when leaving them, making sure to slide down the large metal bar that makes up the old-fashioned lock on the doors.
The last stop on the tour was each individual's room, which turned out to be independent structures  resembling small English thatched roof cottages.
Each room's or cottage's interior boasted a rugged stone fireplace, a dreamy bed with sheer white mosquito netting, large footed bathtub, and an  indoor as well as outdoor shower for the full nature experience. The experience continued  as the drapes were drawn back to reveal a full wall of windows with a sliding glass door that opened  up to a wooden deck. The deck overlooked the huge lodge watering hole, providing the perfect spot for viewing wandering wildlife.
A few minutes later, I am left alone to unpack and freshen up, able to relax briefly  and absorb all of the newness of the experience before making my way to the main dining and deck area for "tea."  Not knowing what to expect, "tea" turned out to be an elegant presentation of appetizers and mini-desserts, all of which were delicious. During this time, the chef introduced himself as well as the dinner menu for each night.  "Tea" also was a social gathering for the safari guests, giving us time to talk and become acquainted with each other before leaving for the nightly safari.

Thursday, June 21, 2012

Baked "Not Fried" Peach Pies


Monday night my parents and I were watching the Masterchef season 3 episode where the contestants had to make homemade apple pies. It happens to me every time I watch food shows; I start craving the foods that are being cooked on tv. This can be a bad thing when I am watching the cooking shows late at night. Haha!
The apple pies the contestants were making brought back memories of my mom’s fried apple pies. I would watch her crimp the edges of the pies with a fork then lightly pan fry them in a cast iron skillet. She finished the pies with a dusting of cinnamon and sugar which took them over-the-top. 
In the South, women grow up in the kitchen watching their moms and grandmothers cook. This holds true for my mom who learned how to make fried apple pies from her grandmother and for me, who learned how to make them from my mom. I wish I could have sampled my great grandmother's (my mom's mom) generously filled fresh apple pies but my memories only take me as far as picking the apples from her trees. I can only imagine the aroma of fresh apples and cinnamon simmering in a pan on her stove.

What could possibly be better than a fried apple pie? Peaches. I love peaches and when they are in season I can eat them any and every way, though there is one way that takes the peach, my not so fried peach pie. I know you are thinking there isn’t anything better than a fried pie and don’t tell me a baked one will be as good but it is.  My baked “not fried” peach pies are just as flaky and crunchy as fried pies. The secret is in the dough.

To follow up my success in using olive oil in making biscuits (check out one of my previous blog posts for the recipe), I decided to try using olive oil in my pie dough. Why bother using olive oil? It is a pantry staple. Gone are the days of not being able to whip up a home baked goods because you don't have butter in your refrigerator. Olive oil is reigning supreme in my kitchen. I conducted my baking test with the olive oil to determine if I could achieve the same flaky texture of a pie crust without butter. For testing purposes, I used California Olive Ranch Extra Virgin Olive Oil.
Knowing the importance of using ice cold ingredients in pie dough, I contemplated what I would do with the olive oil. Should I freeze it into a solid? Should I chill it until ice cold? I decided ice cold so I placed the bottle of olive oil in the freezer for 5 minutes to chill. If kept longer in the freezer, it would have frozen into a solid. 

I worked the olive oil into the dry ingredients with a fork, just like I would with butter. It produced this crumbly texture.
                                           Then I added ice cold water to form the dough.
What I couldn't believe is how simple it was to make these homemade pies. There is something nostalgic about making baked goods from scratch. I don't think there is anything that could make these pies any better.....though a scoop of ice cream or dollop of whipped cream couldn't hurt, after all they are baked. haha!
My mom and I talked about all of the different types of pies we could have by changing the filling. Strawberry, blueberry, or blackberry pies would be great to add to my 4th of July menu.

Baked “Fried” Peach Pies
Pie crust:
1 ½ cups all-purpose flour
¼ tsp. baking powder
¼ tsp. sea salt
2 tsp. fine cane sugar
¼ cup cold extra virgin olive oil (place in freezer for about 5 minutes)
1/3 cup or more ice cold water

Peach filling:
3 Tbsp. butter
1/4 to 1/3 cup light brown sugar (depending on the sweetness of your peaches)
3 large peaches, peeled, pitted, and sliced into 1/4-inch slices
1/2 tsp. ground cinnamon
1 large egg

Preheat the oven to 375 degrees. Lightly grease a baking sheet with cooking spray.

In a medium bowl, sift together flour, salt and baking powder.
Add the sugar. Work in the olive with a fork until fine crumbs are produced (as shown above). Mix the water into the crumble mixture until it is absorbed, then knead lightly (I do this with just one hand, in the bowl) until the dough forms a ball. Cover with plastic wrap and refrigerate for 30 minutes.

Meanwhile, make the filling. Melt the butter in a medium saucepan over medium heat. Sprinkle the brown sugar in the pan. Once the sugar begins to melt, lay the peach slices in the pan. Sprinkle the cinnamon over the peaches. Cook the peaches for 2 minutes on each side. Transfer to a bowl and set aside until to cool to room temperature.

Turn the dough out on a lightly floured work surface. Sprinkle a little flour over the dough. Using a floured rolling pin, roll the dough to about 1/8-inch thick sphere. Using a 4-inch round cookie cutter, cut small spheres. Form the scraps of dough together and roll out again. Repeat. Until about 10 spheres are made.
If dough is thick, pat out until a little thinner. Fill  one side of each sphere with some of the peaches. Fold the dough over and pinch closed. Using a fork, press around the edges of each pie to seal.

In a small bowl, combine the egg and 1 Tbsp. water.
Place the pies on the baking sheet. Brush each pie with a little of the egg wash. Bake for 20 minutes.
Immediately transfer the pies to a cooling rack.

Enjoy the pies warm!


Monday, June 11, 2012

Sweet Memories from South Africa

Last Sunday after only being home for 3 days from my trip to South Africa, I awoke craving a scone. To feed my craving, I made a small adjustment to my biscuit recipe and called it a day. Sadly to say it was not the same. It wasn't that the biscuit was not good but I had the memory and flavor of a scone. The difference being scones are flakier and lighter than biscuits. I wanted to master making scones so I was back at making them on Saturday. I researched online South African scone recipes and traditions associated with them. What I found is that South Africans usually learn to make scones from their grandmother and/or mom. The tradition of making them on Sundays is very popular. How fascinating! My great grandmother would always make her fluffy biscuits on Sundays. I would watch and learn from her the art of making Southern biscuits.
When looking through the various scone recipes online I found that the addition of an egg and milk is what makes scones differ from biscuits. After deliberating over the ingredients and the amounts, I baked my first batch of scones. The end result wasn't what I was looking for. I abandoned the challenge that day and thought more about what I would do differently.
                                                  Buttermilk Scones (Sunday's 1st batch)
Waking up this morning with an excitment for creating scrumptious flaky scones, I flew into the kitchen. "Baking is a science." I have heard this statement over and over but it doesn't really resonate until I am experimenting in the kitchen.
How do I make my scones flaky and light and not cakey and dense? After some deliberating, I came up with what I thought would be the perfect ratio of flour to butter and egg to milk. For the milk, I went Southern style using buttermilk.
Once the ingredients were incorporated, the dough produced was soft and pliable. It was much easier to work with than the dough from Saturday's batch of scones. 
The timer sounded and I opened the oven door with anticipation. The scones were risen nicely but the tops were not browned. Hmmm....this is why I didn't bake all of the dough. To fix this batch, I broiled the tops. They tasted great but the tops needed to have gotten golden brown during baking. 
Breakdown of my experimentation:
1st batch) Baked at 425 degrees F and brushed with buttermilk on top
2nd batch) Baked at 450 degrees F. Tested one with buttermilk on top and one with egg
3rd batch) Baked at 425 degrees F and brushed egg on top
Third time is a charm! Baking the scones at 425 degrees F was the perfect degrees but the problem with the 1st batch was that the scones were not golden brown. The solution was to brush the tops with the egg instead of the buttermilk. The result was flaky and light scones with beautiful golden brown tops which lended both a light crunchiness and appeal.
I can thank chef Reza (UK Food Network's Spice Prince) for introducing me to the proper way to indulge on a scone. After conducting a cooking demonstration at one of the theatres in the Good Food and Wine Show in Cape Town, I relaxed in the lounge with my mom and sister. Then enterd Reza with his explosive energetic personality. He took one look at the tier of freshly baked scones, provided by the culinary students, and dove in. "Where's the clotted cream?" he exclaimed. "The what? I said in bewilderment. In a second, he was out the door and on a mission to find clotted cream. With a smile on his face and a bowl of fluffy mile high cream in his hand, Reza sat down and continued to compose his scone. First smearing the cream then the strawberry jam. I had never seen anything like it except maybe strawberry shortcake which is whipped cream and strawberries on top of a scone like baked good. My first thought though is a biscuit which I have never eaten cream on. I didn't even know what clotted cream was. Reza's face lit up as he enjoyed his concoction. Without skipping a beat, Reza repeated the process three more times to prepare a scone for my mom, sister, and me. After one bite, we understood what the hype was all about.

At home where clotted cream  is not so easily found, I prepared my own cream by beat whipping cream to soft peaks then incorporating greek yogurt. My scone wouldn't be complete without homemade strawberry jam. My foodie memory enveloped me and I was back in South Africa.
Buttermilk Scones
1 2/3 cups self-rising flour
Pinch salt
1/3 cup unsalted butter cut into cubes, cold
2 ½ Tbsp. granulated sugar
1 large egg plus 1 egg (egg wash), beaten
4 Tbsp. buttermilk
Preheat oven to 425 degrees F. Grease a baking sheet with cooking spray.
Sift the flour and salt in a large mixing bowl. Rub the butter into the flour with your fingers until it is the size of breadcrumbs. Stir in the sugar.
In a small bowl, beat the egg and buttermilk until combined.
Stir the egg mixture into the flour mixture and mix until just combined. Then using your hands, lightly knead the dough together to form soft dough.
Place the dough on a floured surface and shape into a sphere then pat down about ¾-1 inch thick. Using a floured 2-inch cookie cutter, quickly push the cutter down through the dough and lift without twisting. Cut out scones, reshape dough, and repeat. Creates about 14 scones.
Place on the greased baking sheet and brush the tops of the scones with the beaten egg. Bake for about 7 minutes. Transfer immediately to a wire rack to cool.
Serve warm with cream or butter and jam/jelly.